PMI Dimensions Drive 3D Geometry

Warning: Use of undefined constant home_feature_photo - assumed 'home_feature_photo' (this will throw an Error in a future version of PHP) in /home/synchron/public_html/blog/wp-content/themes/WP-MagTheme10-Prem/single.php on line 70
Following on from my last post which focused on Live Rules, I would like to show you how easy it is to apply PMI (Product Manufacturing Information) dimensions directly to a 3D model. We have been able to generate PMI information in Solid Edge for some time now but Solid Edge with Synchronous Technology actually allows you to use PMI dimensions to drive and control the 3D geometry directly.
In a regular history based system you are forced to dimension the profile geometry if you want any form of control over the resulting 3D model. As such if you do not apply the appropriate dimensions at creation time, you end up having to return to the feature at a later date to add them or make whatever changes necessary. Since features are dependant on each other in a history based system we may find parts of the model fail as the rest of the features rebuild. This is obviously dependent on the edits we make and how the part was originally constructed.
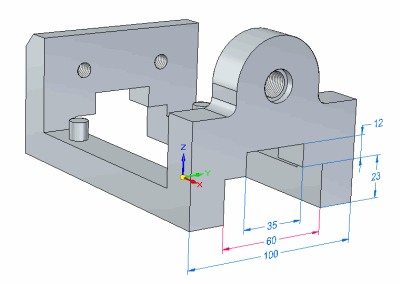
In contrast to this Solid Edge with Synchronous Technology allows you to apply PMI dimensions directly to the model at any stage you want. Of course, if dimensions are applied when a profile is drawn they automatically become PMI dimensions when 3D geometry is created. Once a dimension has been applied to the model its value can easily be modified. However unlike regular parametric dimensions we are able to toggle the direction of the dimension. This gives us a lot of control over which area of the part gets modified. Since there are no feature dependencies changes happen instantly and don’t adversely affect other areas of the model. If you have the need to fix any critical distances, it is possible to lock appropriate dimensions when necessary. It is also possible to define formula between PMI dimensions or automate designs via an external source like Excel or Visual basic.
The final point I would like to mention here is that it does not matter where the geometry comes form. We could import a solid model from any other CAD application – SolidWorks, Inventor, Pro/E etc and we would have the exact same control. Everything you are going to see in the video below could be achieved whether the part had been generated in Solid Edge or not.
View a higher quality version of this video
Keep an eye open for more information on Solid Edge with Synchronous Technology or subscribe to our feed for automatic notification.


Comment by steven Lussier on 9 July 2008:
Hello,
I noticed you were able to draw a circle with out creating a sketch. Is this a new part of the ST functions? Is a sketch created in the back ground?
thanks
Comment by Jon Sutcliffe on 9 July 2008:
Hi Steven, yes this is new ST functionality. The 2D and 3D environments are unified. When you draw 2D geometry on a face it automatically generates a sketch in the background.
You do not have to issue a sketch command.
Many thanks for Visiting our blog. I hope you find some useful information here.
Jon